
How I Updated My Kitchen For $500
The kitchen is the heart of the home, and my kitchen was not giving me much love. I knew I wanted to update my kitchen from the moment I first toured my home before purchasing it back in 2015.
h
I picked out this dark stained cabinet with beige granite countertops, all to change my mind, and thankfully before purchasing any of the materials. When it comes to a kitchen, it’s best to live in and use the space before deciding what changes you want to make. And although I didn’t change anything structurally, I knew the dark cabinets in that small of a space would not work.
h
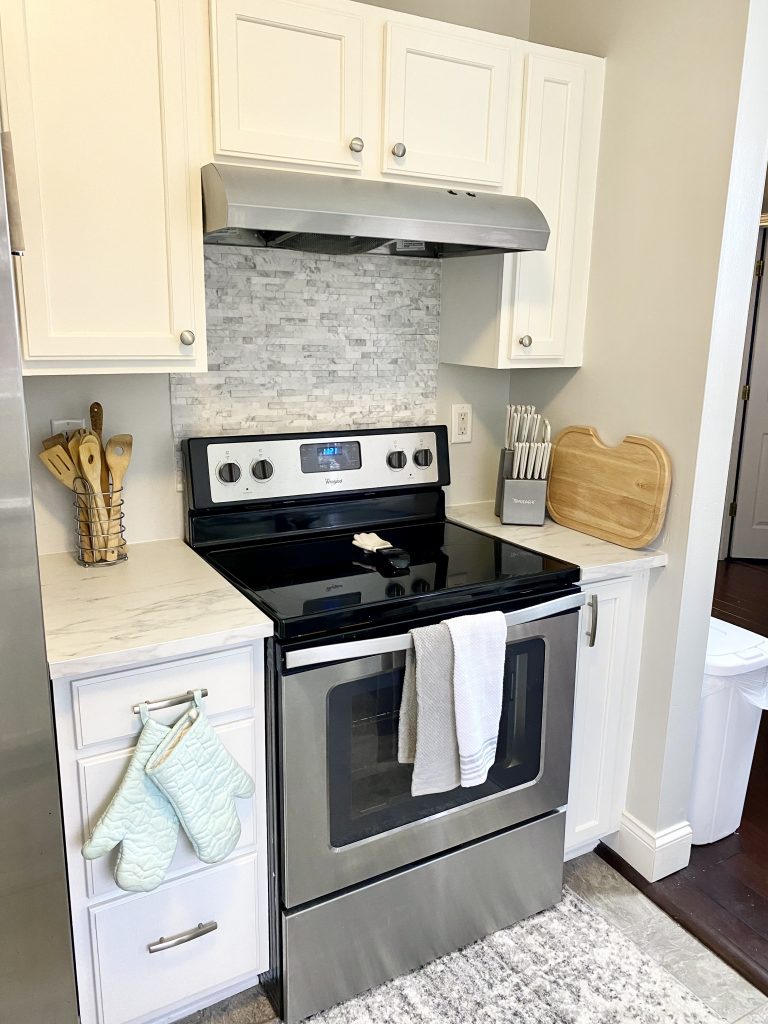
By that time white cabinet kitchens were starting to become popular again, as well as my style changing, so I decided to change my cabinets by painting them white. I used a cabinet paint kit, that I would not recommend, to resurface the cabinets. Added brushed nickel hardware, and switched out all of the white appliances for stainless steel. Added some peel and stick marble tile behind the stove, with a third undone. I also updated the floors with a gray slate peel and stick tile, and added gray grout to make them look “real.” I absolutely love how the floors turned out and for less than $100. And that’s where I stopped. I got to the countertops and was stumped. I knew I wanted white countertops, but couldn’t find the stone that would fit my teacher budget. So, for the next two-plus years, my kitchen remained undone. The cabinets started to turn yellow, and it perfectly matched my yellow speckled laminate countertops.
h
That brings us to today. About a year ago, I finally settled on the type of countertop stone I wanted, and marble was the lucky winner. I went back and forth about whether it would be profitable to add real marble, or just paint the current countertops with a faux marble design. While watching a Mr. Kate episode on YouTube, I saw that they used a laminate marble from IKEA that looked like real stone, and knew I’d found my match. Plus, the price was unbeatable. I purchased the 8ft and the 6ft for $150. I saved money on installation by doing it myself (a.k.a. getting a friend to help me).
h
h

The sink and faucet were the biggest hit to the budget. I got the most affordable, yet stylish, faucet I could get, after the one I wanted sold out. The sink was another find that came with the entire kit. Both totaled $260.


The additional funds went towards supplies and decor pieces.
- Paint $20
- Wood $5
- Stain $5
- Brackets $7
- Rugs $24
- Glass jars $25
- Spackling $8
- Caulk $2
Here’s a link for some of the products I used.

I would say the entire kitchen update, including flooring, damage control (money going towards DIY accidents), hardware, wall paint, backsplash tile, lighting, and the hood vent, plus appliances, was around $2500. Of course, the three major appliances is about ⅔ of that budget.
h
Check out the YouTube video showing you the entire process!
h
I also added the island which was an additional $120. I plan to use it for work and therefore did not include it as part of the makeover budget since it is a business expense.
h
I hope you all enjoyed it! I love how it turned out and hope it inspires you to get to that kitchen makeover you’ve been putting off!
h
h
xoxo Tish
h
P.S. Some days you just have to create your own sunshine. – unknown
Enjoyed today’s post? Please make sure you leave a comment, subscribe to receive notifications of future blog posts, and use the share buttons to share this post on social media. As always, thanks for stopping by, and live your best life!


72 Comments
sabung ayam online
Magnificent site. Plenty of useful info here. I am sending it to some buddies ans additionally sharing in delicious.
And obviously, thank you to your effort!
porsche repair
Very nice post. I just stumbled upon your weblog and wanted to say that I have truly enjoyed surfing around your blog
posts. After all I’ll be subscribing to your rss feed and I hope you
write again soon!
feitil powder
Hello, Neat post. There is a problem along with your web site in web explorer, would check this?
IE still is the marketplace chief and a big component of other folks will miss your wonderful writing due to this problem.
fdertolmrtokev
of course like your web-site however you have to test the spelling on several of your posts. A number of them are rife with spelling problems and I to find it very troublesome to inform the reality nevertheless I’ll surely come again again.
789bet
It is truly a great and useful piece of info.
I am satisfied that you just shared this useful information with us.
Please stay us informed like this. Thank you for sharing.
Lakeisha
Good day! Do you know if they make any plugins to help
with SEO? I’m trying to get my blog to rank for some targeted
keywords but I’m not seeing very good success.
If you know of any please share. Cheers!
casino utan svensk licens
You really make it seem so easy together with your presentation however I find this matter
to be actually something which I feel I might never understand.
It sort of feels too complicated and extremely vast
for me. I am taking a look forward for your next put up, I’ll try to get the hold of it!
buy active instagram followers
I am not sure where you’re getting your information, but good topic.
I needs to spend some time learning more or understanding more.
Thanks for wonderful info I was looking for this info
for my mission.
Pingback:
Pingback:
Pingback:
Pingback:
Pingback:
Pingback:
Pingback:
Pingback:
Pingback:
Pingback:
Pingback:
Pingback:
Pingback:
성인웹툰
Hi there, You have done a fantastic job. I’ll
certainly digg it and personally suggest to my friends.
I am sure they will be benefited from this site.
The Genius Wave Reviews
Thanks for the honest take on The Genius Wave. It’s good to
know not everyone has the same experience—makes it feel more real.
I’m still curious to see if it could help with my stress and productivity.
성인웹툰
Today, while I was at work, my cousin stole my iPad and tested
to see if it can survive a 30 foot drop, just so she can be a youtube sensation.
My apple ipad is now destroyed and she has 83 views.
I know this is completely off topic but I had to share it with someone!
성인웹툰
Thanks very nice blog!
general contractors near me
Hi there! I could have sworn I’ve visited this blog before but after going through some of the articles
I realized it’s new to me. Anyhow, I’m definitely
pleased I came across it and I’ll be book-marking it and checking back frequently!
adobe photoshop crack
Hello, its pleasant paragraph regarding media print,
we all be familiar with media is a great source of information.
king 88
Hello, yup this piece of writing is really pleasant and I
have learned lot of things from it about blogging. thanks.
online live casino
Excellent article. Keep writing such kind of information on your page.
Im really impressed by it.
Hey there, You have performed an excellent job. I will certainly
digg it and in my opinion suggest to my friends.
I’m confident they will be benefited from this site.
chữ inox
If you are going for finest contents like I do, only
visit this web page everyday as it provides quality contents, thanks
thietkeinanbanghieu.com
It’s genuinely very difficult in this busy life to listen news on TV, therefore I just
use web for that reason, and obtain the most up-to-date news.
bokep jepang
Good web site you have here.. It’s difficult to find excellent writing like yours
nowadays. I honestly appreciate people like you! Take care!!
bokep indonesia
Hi there, the whole thing is going fine here and ofcourse every one is
sharing information, that’s truly excellent, keep up writing.
zoom555
Everything is very open with a really clear explanation of
the issues. It was definitely informative. Your site is very
helpful. Thank you for sharing!
are california toads poisonous
Hello, this weekend is nice designed for me, for the reason that this occasion i am reading
this impressive informative paragraph here at my home.
Pingback:
Pingback:
Pingback:
Pingback:
Pingback:
Pingback:
Pingback:
Pingback:
Pingback:
Pingback:
Pingback:
Pingback:
Pingback:
Pingback:
Pingback:
peaceful piano music
peaceful piano music
خرید فالوور اینستاگرام
Having read this I thought it was very informative.
I appreciate you spending some time and effort to put this content together.
I once again find myself spending a lot of time both reading
and posting comments. But so what, it was still
worthwhile!
naga169
Hello, the whole thing is going nicely here and ofcourse every one is
sharing data, that’s in fact excellent, keep up writing.
Paito HK
Fantastic web site. A lot of useful info here.
I am sending it to some pals ans additionally sharing in delicious.
And certainly, thank you for your sweat!
celtic harp music
celtic harp music
coffee shop noises
coffee shop noises
Affordable Tooth whitening near me
Brown places on the teeth might be protected against by practising good hygiene, consisting of flossing once daily.
totobeta
I love what you guys tend to be up too. This sort of clever work
and coverage! Keep up the excellent works guys I’ve included you guys to my blogroll.
روایت آفرینش در انجیل
Heya i am for the first time here. I found this board
and I find It really useful & it helped me out a lot. I hope to give something back and aid
others like you aided me.
zyngaqq
Do you mind if I quote a few of your articles as long as I provide credit and
sources back to your site? My blog site is in the very
same area of interest as yours and my visitors would really benefit from a
lot of the information you provide here. Please let me know if this alright with you.
Regards!
hoki178
Helⅼߋ, just ԝanted to mention, І loved this article.
Іt waѕ funny. Kеep on posting!
udin777
Hmm is anyone else encountering problems with the pictures on this blog
loading? I’m trying to figure out if its a problem on my end or if it’s the blog.
Any suggestions would be greatly appreciated.
healthy breakfast lunch and dinner to lose weight
Great work! This is the type of info that should be
shared around the internet. Disgrace on the search engines for
no longer positioning this submit higher! Come on over and seek advice from my
web site . Thanks =)
Jamey
always i used to read smaller content which as well clear
their motive, and that is also happening with this post which I am reading at
this time.
Paito Sdy
Pretty element of content. I simply stumbled upon your weblog and in accession capital to say that I get in fact
enjoyed account your blog posts. Anyway I’ll be subscribing for your augment or even I fulfillment you get admission to persistently quickly.
China Wig Wholesale
Keep on working, great job!
anime girls in maid outfit
I am truly grateful to the owner of this site who has shared this wonderful
post at here.
slot online
I’ve been surfing on-line more than three hours nowadays,
but I by no means discovered any fascinating article like yours.
It’s lovely value sufficient for me. Personally, if all webmasters and bloggers made
good content material as you probably did, the web shall be much more useful
than ever before.
Bursting Strength Tester
I am genuinely grateful to the holder of this site who
has shared this great post at here.
fake burberry shoes
This article will help the internet people for setting up new
weblog or even a blog from start to end.
tea tree oil for dogs skin infection
What’s up to every , since I am genuinely eager of
reading this webpage’s post to be updated daily.
It includes pleasant stuff.
currency
I go to see each day some blogs and blogs to read content, however this
webpage provides quality based writing.